Tuesday, May 31, 2011

Summer Studio Makeover Week 2

Ok so you might not see much of a difference from week 1 to week 2:
Some of the clutter is gone from the floor and half of the table is cleaned off.  I did clean out an entire drawer of die cuts i still have 2 drawers full)- and sold all of them on etsy!  I also went through the process of moving all of my ribbon from these carts to drawers.  I like the carts but they take up a lot of space. I am selling a bunch of my ribbon here
I also didn't show you my closet last week - actually a lot of my stuff is already organized - most like items are in a drawer or container.  I have all my paper organized by manufacturer and I have containers for flowers, brads, etc.  The real problem is getting rid of stuff.

Oh and I spent most of my week finding art on etsy to buy for the walls of my new studio - yes when faced with the challenge of cleaning/organizing a room I go straight for buying new stuff to put in it!  And if you have any suggestions for cool prints for the wall I would love to hear them!  I am trying to support other artists on etsy. 

Photobucket

Friday, May 27, 2011

What's New in the Shop

I added lots of new stuff to the shop this week including:

 
New Vintage Finds - 5 Lotto Game Cards: $3.00


And a little something for my loyal blog readers:

Happy Memorial Day - enjoy your weekend!

Photobucket

Thursday, May 26, 2011

Thrifty Thursdays - Using Your Stash - Alphas

Today's Thrifty Thursday post is about repurposing something you already have in your stash - alphabets! If you are like me you probably have a ever growing stash of alphas - and if you are like me you can't bear to throw away alphas that either have barely any letters left (you know you will never make a full word out of one set!) or you have alphas from 10 years ago that aren't your taste any more but you spent money and can't throw them away (maybe they will come back in style?)!  Well today's post is for you!
 
Supplies Needed:
Your stash of alphas
White Paper
Glimmer Mist (or other color spray)

Step one - spell out your title (this is great for making unique titles for your layouts).  Use letters from all different alphabets - it doesn't matter what color or pattern they are.  Tip: don't push them down too hard - you will need to peel them back up later!  Step two - Spray over the top of the letters with a color misting spray.  I then dabbed the paper/letters with a paper towel to get the excess mist off.  Peel the letters up (I find its easier to get them up BEFORE drying them paper).  Dry your paper with a heat gun (or let it air dry).  Step 3: Use your title as needed - you could also outline the letters with a black pen.  

 Photobucket
This post is linked here:


Tuesday, May 24, 2011

Summer Studio Makeover

I had a couple suggestions that I post the progress of my studio clean up.  This is a HUGE project - so I was thinking to keep me motivated I would post progress pictures every Tuesday until its all clean and organized - I'm hoping this will happen by the end of the summer - but we shall see.  Now the beginning is pretty bad - and really I should probably be embarrassed by A. The amount of stuff I own and B.  The way it has taken over the entire house.  But if I am going to do this I am going to do it right and show you everything - hopefully by the end of the summer I will have a beautifully decorated, decluttered studio where I will actually want to work!  So the starting point pictures:
 
Now in reality that isn't too bad - but here is where it gets worse -  I have a hall closet FULL of supplies. 
 
And then there is the etsy stuff - a pile in the hall and a pile in the living room. 
Ok I know I know - I'm bordering (bordering?) on hoarding!  So in a perfect world all of my supplies will fit into the studio and ultimately I would love to clean out the entire hall closet and fill it only with Etsy stuff.  That would require getting rid of an entire closet full of paper and supplies.... like I said its a HUGE project! Any suggestions/websites/books/tips for organization?

And if nothing else - this post should make you feel better about your own studio!

Photobucket

Monday, May 23, 2011

Shopping for Vintage Paper

Thanks to everyone who left me suggestions and questions for my blog a couple weeks ago.  I am starting to sift through the ideas and create blog posts out of the things you want to see.  I had a lot of questions asking where I get my vintage items for my kits.  So I have written this huge post to give you a little background and some tips on where to find your own items (though my Etsy shop is also a great place to find items!!).  

I’ve been collecting vintage “things” since I was in high school.  Actually it may have even started earlier than that. I can remember my best friend’s parents having a garage sale and they had an old blue dome style hair dryer – I thought it was the coolest thing I had ever seen!  That was the beginning (of course the dryer sits in the closet of my old bedroom at my parents house – so I guess somewhere over the years it lost its cool factor – or I lost the space to keep it) From there it was vintage purses in high school and college. Then after college I spent a year of AmeriCorps VISTA working in a Habitat for Humanity ReStore – that was the worst thing for a vintage/thrift store junkie – I accumulated a lot of stuff over the course of that year – including TONS of books. 

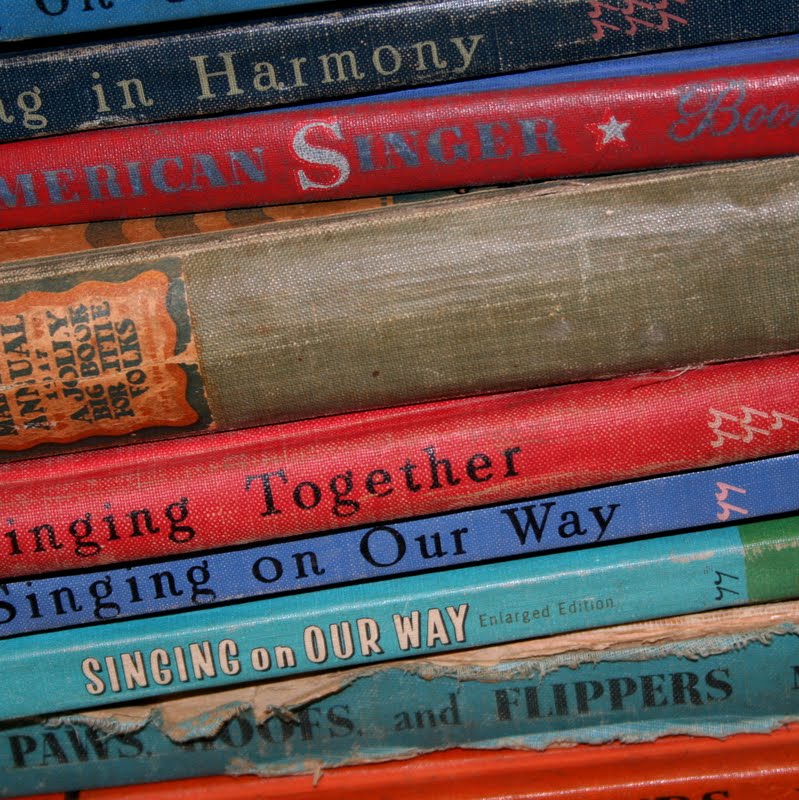
1. What do you look for?  Anything and everything!  I don’t really go looking for anything in particular – I am always on the hunt for the basics – books, postcards, travel ephemera – but I keep an open mind – if it’s made of paper and I can find it for a reasonable price then I’m happy and I usually buy it.  I follow the scrapbook trends and typically attempt to find items that are trendy right now – those trendy vintage inspired scrapbook papers you love (October afternoon, jenni bowlin, sassafrass, 7 gypsies) – well they got their ideas from real vintage items -  I like finding the originals!

2. Where do you find it?  Everywhere – sorry Richmond area readers – not going to name my exact sources!  I find the most luck in what I call “local” thrift stores – typically those run by churches.  I find they tend to price their stuff the lowest and seem to have the best stuff.  I still check out places like Goodwill and Salvation Army but depending on the one you go to they can be overpriced sometimes and I find they tend to have newer products.  Habitat ReStores can be good – because they focus on building materials they often don’t care as much for their books and miscellaneous items and price them to move. 

I also check out Antique stores – particularly the large ones that have multiple vendors – often times they have sales and sometimes you can find a deal.  Of course a lot of times they are overpriced.  Though I say if you find something you love and you know how you would use it – buy it!

I don’t shop at garage sales – mostly because I don’t want to wake up early.   

I do love a good flea mall - though I HATE haggling! (also a reason I don't like garage sales)
I do shop on ebay – sometimes I can find a terrific deal though it takes A LOT of work to sift through everything – a lot of times people overprice or the bid price is low but the shipping is outrageous!  For that reason I typically don’t buy books on ebay.   To find the best deal you need to find someone who doesn’t quite know what they have (and have labeled it wrong  by leaving out the most important details – making it harder to find to the general population) and you typically have to buy in very large lots. 

I find that consignment shops are the worst places – this is typically because multiple people have to be paid (the owner of the item and the owner of the shop) so prices are often very high. 

3. What goes into a kit?  To see my kits you can check out my Etsy shop here.  You can probably see what goes into them – it differs by kit – could be text, illustrations, game pieces, postcards – anything.  What you probably don’t realize is the amount of sources that go into one kit.  Take for instance one of my Bird themed Kits:
 This particular kit has 31 pieces in it.  Those 31 pieces have come from probably at least 18 different books, magazines, or other sources.  I have hundreds of books I have broken apart to make kits ( or future kits - look for lots more this week!) This particular kit is a great value at only $7.75! To make it yourself it would cost far more!  (Sorry had to plug the store!)

I hope this gives a little insight into how I make my kits.  If you have any questions feel free to ask them in the comments (I will answer them in the comments as well!) 
Photobucket

Sunday, May 22, 2011

File Folder Mini Album Tutorial

Just in case you missed my featured artist project on Scrapbook News & Review I am going to post the project tutorial I created for last Wednesday's post.  This project was created from an office supply file folder -it’s a great base project that can be altered a dozen different ways to create fun and new mini books for all occasions!

Supplies Needed:
Corner Rounder
Cropadile (hole punch/eyelet setter)
12” Paper Trimmer
1 Office File Folder
6-7 Sheets Patterned Paper
2 Eyelets
Ribbon and String
Stickers/Embellishments


Tutorial: Step 1: Take out a file folder (you need one with scored lines near the fold).  Put the folder into your trimmer with the side with the shorter tab on the right. Place the natural crease of the folder at 6.5”  Score  (not cut!!).  This will leave you with a flap that is 2.5” (not including the tab) Step 2: Flip the folder around and trim the tab off – placing the natural crease of the folder at 6.5”.  Your folder should have a couple of creases near the spine.  You want to fold on the outer crease to create a spine.  Step 3: Flatten the folder out – place it in your trimmer and trim at 8” to create the height of the book.  Step 4: Trim off the tab on the 2.5” flap.  Round the corners of the flap.  Step 5: Embellish the outside of the folder.  I cut patterned paper slightly smaller than the sides and adhered them.  I adhered ribbon under the back, spine, and flap so that it would tie at the front.  Step 6:  Punch two holes in the spine of the book and set eyelets.  To create the pages on the inside of the book (see pictures below) – cut 3 pieces of paper 7.5 x 12” – fold in half and stack.  Punch holes that match holes punched in the spine.  Use string to hold pages in place.  Step 7: Embellish the inside of the book – I made a pocket on the left side to add journaling and put an envelope on the right side for hiding additional photos and mementos. 

Photobucket

This post is linked here:
The Girl Creativemmm buttonMakingPhotobucketKeeping It SimplePaper Issues Blog Design

Thursday, May 19, 2011

Thrifty Thursdays - Shopping at the Hardware Store

 If you have learned anything about me its that I like to look for scrapbook supplies in the most unlikely of places.  Today I am going to show you a few items I have picked up at my local Hardware Store (Lowes/Home Depot):

 
Drywall Tape:  This is the mesh tape I used in the tag - it's about $7 for the roll.  Now I know I push the limits of what I call "thrifty" in these posts sometimes.  But even at $7 this is truly thrifty.  Some of you may be familiar with a product called "Magic Mesh" found in some craft stores that is marketed to crafters/scrapbookers.  It is about $4 for maybe 1 or 2 yards.  Now the drywall tape is exactly the same - its self adhesive (no need to figure out how to glue it down! - just peel it off the roll and stick.  And I don't think I will ever run out!  There is TONS on the roll!  So I think this is beyond thrifty!!

"Metal" Tape: okay to be honest I bought this several months ago - I have NO idea what it is called or what it costs.  I **think** its for duct work.  It is self adhesive (has a paper backing).  Even though I don't have an example to show you this is a great product for craft projects.  I like to use it with embossing folders through a die cut machine!


Photobucket

Wednesday, May 18, 2011

Featured Artist at SNR

Today I'm the featured artist over at Scrapbook News & Review.  I created this cute little file folder portfolio project just for the occasion.  Check it out here for a tutorial!


And if you are visiting for the first time from SNR - welcome! Be sure to check out the About Me and Tutorials sections (see tabs above). I would love for you to become a follower of the blog or facebook page (link on side of the page).  And check out the Bursts of Creativity Etsy shop for ephemera packs and fun vintage finds!

Photobucket

Monday, May 16, 2011

Giveaway Winners

Thank you to everyone who submitted ideas in last week's giveaway.  I think - and I could be wrong here - but you want tutorials???  haha - I'll keep that in mind! Now on to the winners:

#51 Katie who said: also, are there items/supplies/trends you don't understand/don't like to work with? everyone has a different style and it's always interesting to me to learn what people don't like. personally, i am not a glitter kind of girl! not a very girly scrapper.

#23 Simpson Home/Kathy who said: I love your blog. It inspires me to see how you use recycled or up-cycle things to make treasures. I would like to see more examples of what you put into your journals- especially the art journals. The idea intrigues me, but I don't know where to start. Please keep doing the tutorials too.

Send me an email at burstsofcreativity(at)yahoo.com to claim your prize.
Photobucket

Saturday, May 14, 2011

Packaging Idea

What do you do when you run out of tissue paper and you have Etsy orders to fill - wrap items in vintage maps of course!

Photobucket