
Tuesday, August 30, 2011
September Creativity Project
Monday, August 29, 2011
My Weekend
I spent my Saturday in the dark praying trees wouldn't fall on our house. Four trees did go down - one on my car - one taking out the neighbors cars, and two narrowly missing our house - luckily no major damage! Thanks Irene...
 I can't believe this didn't hit the house - you can't even see the end of the tree from here - but basically it landed on our back deck railing! How was your weekend?


Wednesday, August 24, 2011
Uncle Dustin Layout


Tuesday, August 23, 2011
From the Studio
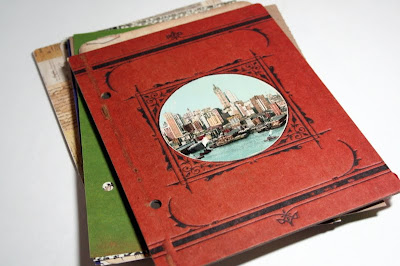
I think my studio clean up is officially over. I still need to take pictures and do a "big reveal" - hopefully I will have that ready soon. But for now I am going to show you what I have been working on. We went to NYC for our honeymoon in 2007 and I have been holding off on scrapping the photos because I wasn't sure how I wanted to. I really wished I had been doing travel journals back then because now I have these photos (and sadly not that many) and a few brochures but I can barely remember anything about that week! (I have a terrible memory!). So now I am going to go back and make a mini for it. I have only worked on the cover and inside of the cover but thought I would share - the cover has a vintage NYC postcard from 1909 cut out to fit the circle on the front of the 7 gypsies book cover:


And finally a sale update: I added more items to my "Spring/Summer Cleaning Sale" in my Etsy shop. This is the last of the items - so get them while they last.


And finally a sale update: I added more items to my "Spring/Summer Cleaning Sale" in my Etsy shop. This is the last of the items - so get them while they last.
Monday, August 22, 2011
Farmer's Market Layout
If you "like" my facebook page then you know yesterday I decided to lock myself in my craft room until I got something done. I figured I would force myself out of this rut! Well 3 hours later and I finished two layouts! Which isn't really all that much but its a start. Today I am going to share with you a layout I made to document our Saturday mornings at the Farmer's Market:


 Come back later this week to see the other layout I created!
This post is linked here:


This post is linked here:
Thursday, August 18, 2011
Thrifty Thursdays - Using Your Stash - Die Cuts
There's nothing thriftier then finding new ways to use products you already have! Today's post is a new spin on your current die cut machine or punches - using them as masks or stencils! For this project I used my silhouette (because I have thousands of shapes saved for it) but any die cut machine will work - circuit, epic, cuttlebug, big shot , etc.
To start this project you need to cut out a couple shapes - I used scrap paper and cut the shapes with my silhouette then cut the paper down so I had a stencil. This is a great technique for reusing the left over piece from a die cut (don't just throw it away!). Place the stencil over a tag (or your paper) and spay with glimmer mist. I also used it with paint (in the last photo). If you want a cleaner/crisper outline - trace the image with a black pen.


I really like the silhouette for this technique because they have all sorts of backgrounds you can cut out (and download instantly!). I used this diamond pattern by first spraying with one color, moving the stencil to cover the sprayed portion and spraying with a second color.
And finally if you don't have a die cut machine - no worries! You can still do this technique! Get out your circle punches (i used two sizes) punch them randomly on a sheet of paper and use as a stencil for a glimmer mist spray. Or just punch one hole and use paint or distress ink stain to get perfect circles! 
Look around your house for every day objects you may be able to do this technique with - doilies make a lovely mask for a spray! Or cut out your own shapes - remember when you used to make paper snowflakes as a kid? Try making them and using them as a mask! So many possibilities!
Friday, August 12, 2011
In a rut...
I have been in a creative rut for a while now. I'm thinking I need to come up with a challenge for myself. Maybe like I did last September - when I tried to do something creative every day. (see all of those posts here). I'm thinking of trying to do a month of art journaling. But I did also just get a HUGE order from two peas recently (with all that fabulous new My Mind's Eye papers!!) so maybe a challenge to make X amount of pages in X amount of time? Hmm.... will have to give that some more thought... am hoping to create some sort of challenge for myself in September again. But for now having fun on the rare occasion I do sit down and play in the studio.
And if you are wondering what happened to Thrifty Thursday - well I never finished it but here it is:

I had the idea to make a mini (very mini) book out of cardboard floss bobbins. I didn't get passed the covering the bobbins part. They would also make cute embellishments for scrapbook pages (wrap some twine around them?)
Monday, August 8, 2011

Friday, August 5, 2011
What's New in the Shop

Each one is different but may include photographs, postcards,
milk caps,receipts, tickets, text, game cards and more!


Vintage Postage Stamps


Vintage Flash Cards
Thursday, August 4, 2011
Thrifty Thursdays - Passport Mini
So I'm thinking I need to change the name to "Mini Book Thursdays" because it seems like I am always making mini books!! Today's mini was made from one of those passport covers. I found this one at Tuesday Morning for $2.99 (which is kinda thrifty!?!?) I think this would be a cute mini to make for trips out of the country. Particularly if it says "Passport" on the front (which they usually do) This one says "good times" so it could work for anything.
Tutorial:
 Supplies Needed: passport cover, sheet of cardstock, pages of an atlas (or patterned paper), ribbon, string
Step 1: In my passport cover there was a sheet of paper - take this out and measure it. (if you don't have one you need to do a little measuring/trial and error to find what will fit) mine was 5 x7
Step 2: Cut one sheet of cardstock and pages of maps to the same size as your template (5x7). I cut 6 map pieces. Fold the pieces in half.
Step 3: Punch holes in the paper and tie a piece of string to hold it together.
Step 4: Insert the cardstock page into the passport cover (front and back)
Step 5: Punch holes in the cover and tie a piece of ribbon to hold the book together. I used a cropadile to punch the holes because it punches through everything!!
Step 6: Decorate and insert pictures!


Tutorial:

Step 1: In my passport cover there was a sheet of paper - take this out and measure it. (if you don't have one you need to do a little measuring/trial and error to find what will fit) mine was 5 x7
Step 2: Cut one sheet of cardstock and pages of maps to the same size as your template (5x7). I cut 6 map pieces. Fold the pieces in half.
Step 3: Punch holes in the paper and tie a piece of string to hold it together.
Step 4: Insert the cardstock page into the passport cover (front and back)
Step 5: Punch holes in the cover and tie a piece of ribbon to hold the book together. I used a cropadile to punch the holes because it punches through everything!!
Step 6: Decorate and insert pictures!


Tuesday, August 2, 2011
Summer Studio Makeover Week 11
My studio is now 99% done!! YAY!! The floor is completely clear. Stuff is in its place (for the most part!). If you are a facebook fan you saw that I hung up art on one of my walls. I also decorated one of my other walls which is what I am sharing with you today. I really wanted to incorporate some of my collection of vintage stuff - cameras, photos, paper goods. I hung shelves above my windows and metal pottery barn shelves on the wall (which quite frankly were a giant waste of money and are really only good for what I did with them - they aren't very practical!)

 So what do I have left? I few more staging and decorating projects. I have one more blank wall I need to figure out - and a chair! I need a new chair! I'm currently using one of my dining room chairs which doesn't match and needs to go back to the dining room! Hopefully I will have pictures of the whole completed studio soon!


